
Blog
Introducing the Newly-Redesigned Etoile Web Design Website
Read Post →
Custom Order Status Emails for WordPress
Once a customer has placed an order, there’s nothing that they appreciate more than information on the status of their order. One of the easiest ways to give them that information is by providing updates via email, using our Order Tracking WordPress plugin.
To get started, head to the Emails tab of the settings page of the plugin. From there, you’ll want to create an email for each order status that you’d like to notify your users about. For example, you can create an email named “Order Received”, with a subject “We Have Received Your Order!”, and a message that says “Thanks for placing an order with us! Your order number is [order-number], and it was received at [order-time].”
As you can see, you can include information specific to an order by including the correct tag within your email. We’ll go over those more at the end of this blog post.
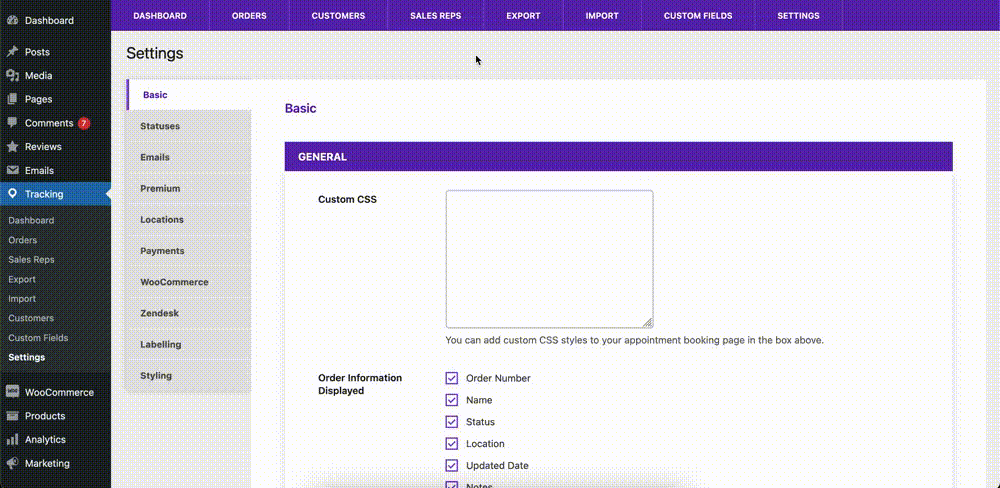
Next, we need to choose when to send out the email that we just created. The first thing we need to do is make sure that emails have been enabled. To do so, go to the Basic tab, and set Order Email Frequency to On Change. This setting means that an email is sent out to the customer each time the status of their order changes.
Once that’s done, go to the Statuses tab. Find which status you want to trigger the email that you created. In our case, we’ll send out our email when an order is set to Received. After that, make sure that your settings have been saved and your emails should be ready to auto-send when an order is assigned the Received status!

The email tags that can be used include:
[order-name] The name of the order
[order-number] The number of the order, which the customer will use to view their order in your tracking form
[order-status] The current status of the order
[order-notes] The publicly visible notes you’ve added for the order
[customer-notes] The notes that the customer added to the order
[order-time] The time the order was placed
[tracking-link] A link to track the order directly on your site, so that the customer can view more information about it
You can also include the order-specific values for the custom fields that you’ve created for your orders. To do so, you’d add [custom-field-slug] tags within the order email, where you add the slug specific to your custom field within the square brackets.

You can really take advantage of custom order emails by enabling WooCommerce integration, so that orders get automatically created whenever a WooCommerce order is placed.
Don’t have any custom fields created yet? Check back next week when we cover creating custom fields for your orders in WordPress!


Discover all of our WordPress plugins
Browse Plugins