Blog
Introducing the Newly-Redesigned Etoile Web Design Website
Read Post →
Styling Your Blog Site
We’ve put together this post to go along with our video tutorial series that shows you how to set up a shop site. Once you’ve added the content and followed the last video (which explains how to run your checks and debugging), you’ll want to look at styling your site. This post covers the steps we took to get our demo site looking more professional and polished.
You can view our demo site here: http://www.ewdyoutubetutorials.com/blog-site/
Logo
The first thing we did was add a new custom logo. If you’re making the site for an existing store, it’s likely that you’ll already have branding and a logo in place (on your storefront, marketing materials, etc.). If it’s a new startup, you can work with a graphic designer to create a unique logo that captures the essence of your company. Either way, you’ll want to display this logo prominently on your site.
After adding the logo, we needed to make small adjustments to the heading/logo area in our theme. We used CSS for this. WordPress provides a section in their theme Customizer called “Additional CSS” that you can use to add in your own custom CSS. We used this to adjust the width of the logo.
Homepage
After getting the logo in there, our next focus was the homepage, as that’s the first thing people see when they come to your site, and the page for which we needed to make the most changes.
It’s worth mentioning again, at this point, that, when setting up a blog site, one thing you want to make sure to do is go into the Homepage Settings area of the Customizer and set the front page to your latest posts, as opposed to a static page like you’d do for most sites.
The big image slider that shows at the top of the homepage is a feature that came with the theme (Kale) that we used. Using the “Banner/Slider” section (which itself is in the “Front Page” section) in the Customizer, we were able to select which blog post category we wanted to use to populate the slider and how many posts from that category to show.
Under the slider, there is a featured posts section, which we also used the Customizer to populate (found in Front Page > Featured Posts). For this section, the theme lets you choose each of the three posts you want, regardless of category, making it really straightforward.
Finally, on the homepage, there is a big highlighted post that shows near the bottom. You can also use the Customizer to choose what post you want to show here (found in Front Page > Large/Highlight Post).
Inner Pages
While the blog post and archive pages did not require any further styling, we did have to make a small change to the CSS of the other pages (such as the Frequently Asked Questions) to hide the featured image. We felt that it was a good idea to provide featured images for these pages, to help with things like the search, but that it didn’t necessarily belong at the top of each page, like is found in a blog post.
An important distinction between a blog site and a regular site is we feel the sidebar belongs on all pages. While the Kale theme does provide an option for a full-width page (no sidebar), we believe that it’s better to give people access to your recent posts and blog categories on every page, since the blog is the main focus of the site.
Besides this, we also added some CSS to make the button in the contact form match the styling of the rest of the site, and also to make the comment area on the contact page line up with the rest of the form. It’s important to note that the Additional CSS area can be used not only to modify the styling of theme elements, but also for elements from other plugins, like the WP Forms plugin, which we used on the contact page.
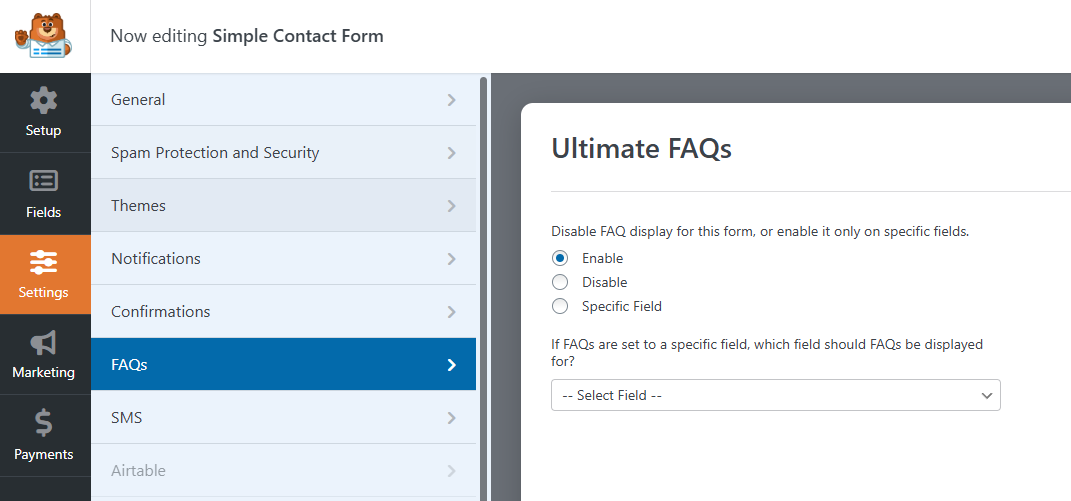
FAQ Page
The Ultimate FAQs plugin that we are using to create our FAQ page comes with a lot of options that we made use of to bring the styling more in line with the overall feel of our site. In the plugin options, we chose the Block style layout and a different toggle icon. When then set it so that h3 headings would be used for the category titles and h4 headings for the questions, and then set the font size for each of those. We then used plugin options to hide the author of the post, to move the posted date below the answer, and to choose the color of the various FAQ elements.
We then also added some additional CSS to adjust the spacing and positioning of the various elements in the FAQ body and also to adjust various font sizes.
Here’s the final Additional CSS code that we used.
body {
color:#333333;
}
.logo img.custom-logo {
max-width: 300px;
}
.page .entry-thumb img {
display: none;
}
/*faq page*/
.ufaq-faq-category-title {
margin-bottom: 20px
}
.ufaq-faq-category-title h3 {
font-size: 20px;
letter-spacing: 0;
}
.ufaq-faq-title-text h4 {
text-transform: initial;
letter-spacing: 0;
}
.ewd-ufaq-post-margin-symbol {
margin-top: 1px;
}
.ufaq-faq-title {
padding: 1px
}
.ufaq-faq-post {
margin: 0 0 20px;
line-height: 1.5;
}
.ewd-ufaq-author-date {
margin-bottom: 13px;
}
.ewd-ufaq-date {
font-weight: normal;
}
.ufaq-faq-categories {
font-weight: bold;
}
.ufaq-faq-categories a {
font-weight: normal;
}
.ufaq-back-to-top-link {
font-size: 13px;
text-transform: uppercase;
font-weight: bold;
}
.ufaq-permalink-image {
margin-top: -30px;
margin-left: 82px;
}
/*contact us page*/
div.wpforms-container-full .wpforms-form input.wpforms-field-medium,
div.wpforms-container-full .wpforms-form .wpforms-field-row.wpforms-field-medium,
div.wpforms-container-full .wpforms-form textarea {
max-width: 100%;
}
div.wpforms-container-full .wpforms-form button[type=submit] {
background-color: #2d2d2d;
padding: 14px 32px;
color: #fff;
border: none;
cursor: pointer;
}
div.wpforms-container-full .wpforms-form button[type=submit]:hover {
background-color: #5d5d5d;
border: none;
}

Discover all of our WordPress plugins
Browse Plugins